


Monday, 14 March 2016
Friday, 5 February 2016
BrillBird Conversion Course

PLAY TIME!
FIRST IMPRESSIONS........
I have started on my 2016 nail goals by attending an acrylic course, trialing out another brand of acrylic from the company BrillBird.
The ever amazing Jill Roberts who is the new educator for the company just happens to live in New Plymouth! How lucky are we?! She is super sweet and her classes are so fun, I can't wait to do some art courses with her...her work is incredible!
FIRST IMPRESSIONS........

I love the pots! Cute little triangles, the only thing I would say is that the pot takes up more room as the amount inside is in a cylinder hole, but its just packaging, product is what counts.
The product was really nice to use, easy to get ratios right (even in this heat!!).
Cover pink was a good coverage, thats always a plus.
The product was really nice to use, easy to get ratios right (even in this heat!!).
Cover pink was a good coverage, thats always a plus.

The form (I used the one I got lol so didn't have a photo of my own to use) was a good stickiness, reasonably easy to apply and I love how they have lines for stiletto, when my artistic forms have almond or rounded lines.
 |
| Myself-left, Rennell-right and Nyssa over that way -> somwhere lol getting our acrylic on. |
We had such a fun time at this course!
We got some good tips and tricks and we get a BrillBird certificate to show we know how to use this system.
We got some good tips and tricks and we get a BrillBird certificate to show we know how to use this system.
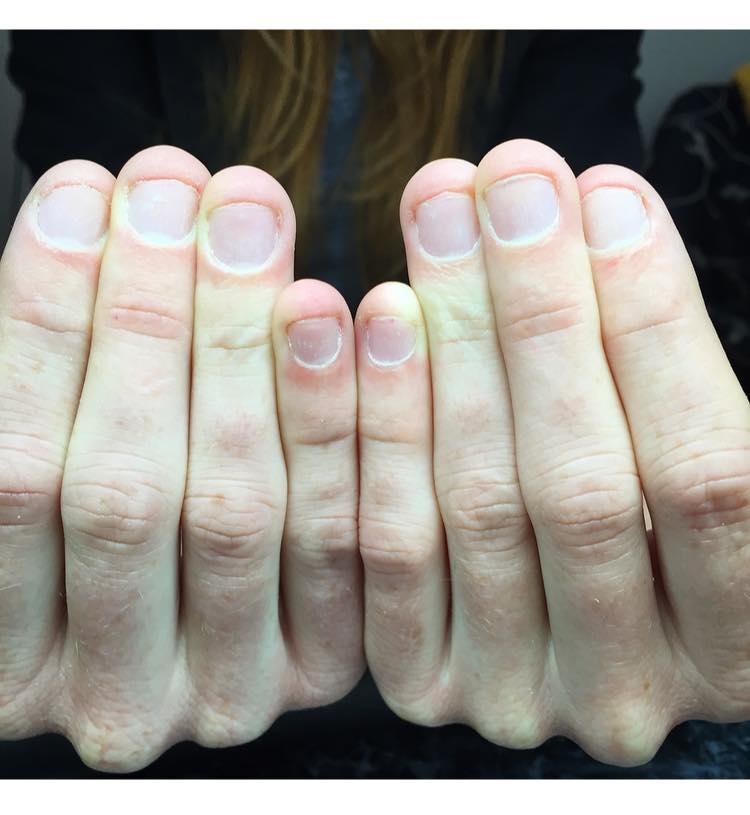
Below are my efforts for the day:


Index - Encapsulated 3D
Middle - Encapsulated Glitter Fade
Ring - Reverse Application Glass Stiletto with 3D art
Pinky - Reverse Application French
My natural nails were quite long so the only extension was on my ring finger the rest are acrylic overlays. You can see I got lazy and didn't fix my ring finger cuticle line....but that was pure laziness lol I'll be changing that one up anyway so I will fix it later.
It's so important in an industry where new things pop up every week to go and do upskilling when you can. You always have room to improve and learn new things.
It's so important in an industry where new things pop up every week to go and do upskilling when you can. You always have room to improve and learn new things.
On that note ill leave you with the food I ordered when we had our lunch break......droooooool

B xxx
Follow me on Facebook: www.facebook.com/BethelColemanNailArtist
Follow me on Instagram: @bc_nailartist
Follow me on Instagram: @bc_nailartist
Friday, 22 January 2016
Why does it cost extra for nail art?

Nail art.
The thing that can transform your nails from run of the mill everyday,
to individual glam filled personalized pieces of art.
The thing that can transform your nails from run of the mill everyday,
to individual glam filled personalized pieces of art.
Don't get me wrong, they're not everyone's cup of tea, I'm not telling you that you HAVE to have nail art to have a fancy manicure, and to be honest some days even I can't be f....uhhh bothered with it lol.
If you've ever seen or had nail art done you know that it is not as easy as it looks, and every brush stroke or glitter sprinkle is very carefully placed and applied with an extreme amount of thought.
If you've ever seen or had nail art done you know that it is not as easy as it looks, and every brush stroke or glitter sprinkle is very carefully placed and applied with an extreme amount of thought.

And yes it may be a quick glitter fade, or a few polka dots,
but what you aren't thinking about is how much that glitter may cost, or how much product is wasted when applying polka dots, or the tools that are used to complete these looks. It all comes into play when artist price their work.
But most importantly....
TIME.
TIME.

Anything that takes longer than a regular colour application should be, and is for myself, considered art.
As a client try and remember you aren't just getting your nails painted by a random person....
The woman or man sitting in front of you usually has spent a lot of money learning and practicing how to do these things on your fingers, they are creating something, something that will never truly be created in the same way and once you've worn it out it will only remain in an image (if she (me lol) remembered to take a photo)
Really, that means the nail art on your fingers, is priceless.
So if you're wanting art, dont expect it for free...
Support your nail tech (most of you do and we are super grateful for that) and pay that extra $ for that customized design.
B xxx
Follow me on Facebook: www.facebook.com/BethelColemanNailArtist
Follow me on Instagram: @bc_nailartist
Friday, 15 January 2016
2016....a year of growth

It's crazy to think that this time last year I had no idea where I was heading or what I wanted as my career....becoming a mother you almost inevitably lose your way and wonder how the hell you're going to get back on your feet.
It's scary.
And not matter how many times you get told,
"it's ok, your allowed to have a break from work"
or
"you're still young, don't worry you have time to figure out what you want to do"
you still feel like you're failing as a parent because you should be contributing towards family income.
Losing sight of the fact that you are contributing, you're raising your children and that my friends is no easy task...leading to the fact we also forget that sometimes we need 'me' time.
This is where I decided to return to the nail industry.
I was reminded by a friend at how much I enjoyed sitting there with new people everyday creating art on their fingers and seeing their smile as they walked out of the door knowing I just had a small part in making them feel better about themselves.

So I got my ass into gear and started researching brands that were around and saw an awesome brand and new nail academy that was coming to my town to do some nail art courses.
I jumped on board and never looked back!
Those 2 days I attended brought back my passion, even though initially I had thought it would be a hobby, something for myself, until I figured out what I was really ment to be doing, I decided there and then that I would be doing this as my job and shit got serious.
Now don't get me wrong, becoming a home salon is not cheap and it took me a while to build up my stock and equipment I needed to successfully pull this off, and I'm still going...
My first purchase was a gel polish kit from Monaco Pro, and my very first client paid for my next polish, and my next for my next. My business is paying for itself which is the best feeling!
This year I have decided that half of what I make will stay in the business and the other half will go back into my family paying for things like swimming lessons and school stationary, after all whats the point in working if you don't get anything out of it.
This year I have also decided to set strict boundaries on what and when things go on in my nail room.
For instance child rules, you'd think these would be just general smarts but sometimes people don't understand the dangers of a baby being able to touch chemicals or trying to get into rubbish bins.
And to make sure I don't run myself into the dirt I have decided that my hours are my hours, I was getting quite lenient with random nail clients but that has to change to ensure I get time off and my kids still get their mother at home, which is why I work from home in the first place.
I want to take this section to sincerely thank all my friends and family that supported me making this journey and have got me to the point now where I have frequent strangers inquiring and making appointments. You are the reason I have a job xxx
I have set myself goals for my nail business this year, something I have never done before and I am planning on attending nail courses and workshops whenever I can to ensure the success I foresee for myself.
Happy New Year to you all xxx
May this year rock our socks off
B xxx
Follow me on Facebook: www.facebook.com/BethelColemanNailArtist
Follow me on Instagram: @bc_nailartist
Follow me on Facebook: www.facebook.com/BethelColemanNailArtist
Follow me on Instagram: @bc_nailartist
Friday, 23 October 2015
Nail Biters
Biting fingernails is a habit that often starts in childhood.
Studies show 60% of children and 45% of teenagers bite their nails.
Nail biting becomes less common after age 18, but it can continue into adulthood. Many adults and children are often unaware they are biting their nails because doing so has become a habit. it can be the occasional nibble to a more serious problem.
Regularly biting your nails and cuticles can leave your fingers red and sore. The area of skin around your nails may bleed and become infected.
Bacteria and viruses passed from your fingers to your face and mouth can make you vulnerable to infection.
This is where nail technicians can be your best friends!!!
There are so many options to help strengthen your nails to the point where they will be strong enough to grow naturally.
IBX and gel polish, Hard gel (extension or over lay) and Acrylic (extension or overlay)
(If you want to know more about IBX I have another post about the benefits here...)
What is hard gel?
Hard gel is a higher viscosity gel formula that comes in light proof pots.
It can be extended out (extension) or just placed on top of your natural nail. This is called an overlay.
What is acrylic?
Acrylic is a 2 step system with liquid and powder in which a brush is dipped into the liquid and then placed into the powder to form a ball. This sets naturally.
It can also be used for extensions or overlays.
What is best for you can depend on your hobbies and life style. Your nail tech should be able to suggest the correct form of nail service for you once she has found out what these are.
The below success story is solely from gel polish appointments.

The first step towards stopping the biting habit.

<-------This was 3 weeks from her initial appointment and the results are amazing!
A few millimeters feels like a lot more to a nail biter and it can take a while for them to get used to the extra length, so maintaining them and keeping them short is the best option.
My next success story is based on an acrylic extension.

<------This client is very hard on her nails, she works with horses, is a solo mum and does a lot of gardening.
She
has bitten her nails for a very long time and struggles to grow them
out due to the skin in front of her nail beds which are slightly pushed
up.
This means her nails grow into her skin which is uncomfortable.

<------This is after an acrylic extension with ACG gel polish.
I kept the length below the edge of her fingertip and rounded the edges so she would be less likely to catch them on things.
These are sculpted using forms (which i talk about in THIS blog post)
She has reported that she has had her nails stood on by horses, got caught in buckles, been in a lot of water, had some medicinal chemicals on them and the acrylic is still in perfect form, no lifting and no chipping.
Her nails are a little sore from knocking them around (she admits she is very rough with them), but its possible that the acrylic saved her from getting yet another bruised nail as it took most of the impact.
I have yet to do a hard gel service on a nail biter but it will essentially have the same impact as acrylic except it is slightly softer and more flexible. This would be suited to someone with hands in water all the time or someone that doesn't like the smell of monomer (used in acrylics).
Long story short....if you're ready to grow your nails or want a quick solution for a special occasion, get in contact with a qualified nail technician who can provide a high quality service so your natural nails will be taken care of underneath your enhancements.
B xxx
Follow me on Facebook: www.facebook.com/BethelColemanNailArtist
Follow me on Instagram: @bc_nailartist
Follow me on Instagram: @bc_nailartist
Friday, 25 September 2015
IBX Nail Treatment
Its time someone did something about this….enter IBX

Sooooooo…..What is this stuff??
IBX is a system from the brand 'Famous Names' (creators of the amazing cuticle oil Dadi'Oil) and is a 2 step system aiming at restoring damaged nail plates and protecting them from future damage.
Most strengtheners used for nails (particularly in traditional nail polish strengtheners) contain formaldehyde. Not only this but all it does is sit on top of the nail plate. This doesn't really do anything to help promote the growth considering it wears off mostly from the end your needing the strength within the first day!
IBX soaks IN TO the nail plate and is cured inside!!!
And even better NO FORMALDEHYDE!!
Also it is not something you need to have removed, once its in there, its in there and you can start on your way to growing your own nails without the need of enhancements.
 |
| IBX Repair |
 |
| IBX |
The procedure itself is painless and in my opinion works best when another service is applied on top to give extra protection to your nail plate while it is being repaired.
IBX has been shown to repair severe nail damage, it toughens the upper layers of the nail plate 'fusing' them together allowing the nail to grow out naturally strong. With multiple treatments IBX fills up deep grooves resulting in a smoother nail plate.
A major problem a lot of people have is delamintaion, or most commonly called peeling. This is where the nail plate layers separate, flake off, get filed off or picked off making the nail plate weak, brittle and unable to grow out the free edge. IBX can fix that too!!
The top five things Famous Names would have you know about IBX are:
• IBX is a Natural Nail Strengthening System made to Protect nails under ALL Gel Polishes and to Grow natural nails
• IBX is applied to the surface of the nail but cured to the inside of the nail to create strength within
• IBX creates a protective shield for the nail
• IBX can repair severe natural nail damage
• IBX is an ongoing treatment to keep nails in a healthy state.

How much?
I charge $5.00 per layer with any service.
So, if you come in for a gel polish service and you are wanting to add this to your manicure, the first application would be an added $15.00, follow up appointments would range from an added $5-$10 and depend on your nails, which would be discussed with you at each appointment.
As it states above, this is not a permanent solution. you do need to continue your IBX treatments to get the full effects. But if we do it for our face and hair, then we can do it for our nails too.
B xxx
Follow me on Facebook: www.facebook.com/BethelColemanNailArtist
Follow me on Instagram: @bc_nailartist
information and images from http://ibxnails.com/benefits-ibx-system
Tuesday, 8 September 2015
Baby Boomer Acrylic Nails

Again I'm am super grateful for having people willing to take time out of their day to let me practice on them. I wish I was faster but I really am learning from the beginning again.
People tend to be more lenient on people who are in training, so I feel pressure to live up to expectations just because I am already qualified. But the truth is I am in the same boat right now as everyone else who has still yet to finish their course.
Baby Boomer Nails........soooooo not as easy as it looks.......
Why is it called 'baby boomer' anyway?
I googled the question to see if i could find the answer....could i find on straight away? NO
It seems no-one really knows why they are called this. So I used my detective skills and came to my own conclusion!
The baby boomer era is known from approximately 1946-1964, why? because in 1945 when the world war ended there was an influx of babies born about 9 months later.....we can guess why
and the number of babies born each year averaged about 4million until 1964 when the births tapered off.
In this time of the baby boom, the most popular nail colours were bright red, frosted pinks and whites. So for reasons that seem obvious to me this is why the frosted ombre pink and white nail trend was named because of the era the polish colours were most popular.
Little history there for ya....

I am slowly getting the hang of sculpting instead of using tips, right now I wish I could just scrunch them up and throw them away, they are so infuriating when you are getting used to how they are ment to fit to the finger....but I was getting some of them 1st try.
And my other major issue is powder to liquid ratio. I know half the time my beads are too wet but they look fine before I place them down.
At least this time I didn't have a light making it impossible to judge the curing time of the acrylic.

As you can see from the image above the ombre was not executed as perfect as I had hoped.
It was a little patchy, blending acrylic is waaaaaay harder than I remember.
This is a technique I will be probably having to practice on myself many times to get better at it.
And here I was thinking I wouldn't have to practice acrylics on myself....Wishful thinking.
Because I wasn't completely happy with the final result I put her favourite gel polish ontop...

Getting back into this acrylic business is a lot harder than I'd thought, but the only way to get better is to keep practicing, so that's what I am going to do.
Follow me on Facebook: www.facebook.com/BethelColemanNailArtist
Follow me on Instagram: bc_nailartist
Subscribe to:
Posts (Atom)